Has nature got all the answers already but we can’t see the wood from the tree? Let’s make some pull apart garlic bread and see!
As I recently have some time, I was searching on the internet a few days ago. Looking for fresh, interesting thoughts, inspiring recipes that We have never used before, to amaze my loved ones with. Looking for a long time unfortunately could not come across too many interesting things. Right before I wanted to give up on it, I stumbled on this delicious and simple treat simply by chance. The dessert looked so fabulous on its photos, it called for urgent actions.
It was easy to imagine just how it is created, how it tastes and just how much boyfriend might enjoy it. Mind you, it is extremely simple to impress the man when it comes to desserts. Anyhow, I went to the site: Suncakemom and used the step-by-step instuctions that have been coupled with wonderful photos of the operation. It just makes life less difficult. I can imagine that it is a bit of a hassle to shoot photos down the middle of baking in the kitchen because you most often have sticky hands so that i genuinely appreciate the effort and time she placed in for making this post and recipe easily followed.
That being said I’m inspired presenting my own recipes in the same way. Thanks for the idea.
I was tweaking the main mixture create it for the taste of my family. I’ve got to mention it absolutely was a great success. They loved the flavor, the overall look and loved getting a treat such as this in the middle of a hectic week. They basically wanted lots more, more and more. So the next time I’m not going to make the same miscalculation. I am likely to twin the volume to keep them pleased.
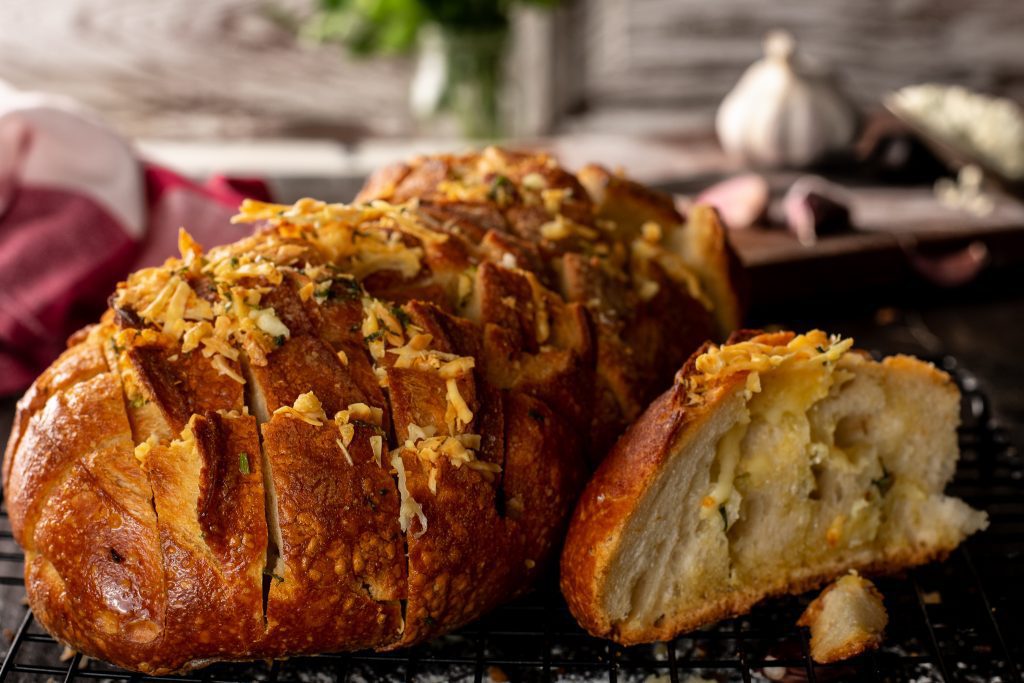
Pull Apart Bread credit suncakemom.
Advanced
Dough
Knead together flour, sliced butter, egg, milk and crumbled yeast.
Cover the bowl and leave it in a 68°F – 81°F /20°C – 27°C place for about 30 – 90 minutes to double or at least rise.
Filling
Cream butter with finely chopped or crushed garlic and parsley.
Assembly
On a floured work surface, roll the dough into a 12 inch / 30cm square. Flouring underneath the dough is important as this coating will prevent it to stick down.
Spread the garlic butter on top of the dough.
If cheese is used, this is the time to sprinkle it on top.
Cut the square into 4 – 5 equal strips. For width check the width of the baking form and go by that.
Put them on top of each other. This may be trickier as it sounds if the dough sticks to the counter. Use a plastic scraper to help getting the dough off the worktop if it’s necessary. The dough is quite soft so try not to pull it much more than necessary.
When they are evenly on top of each other, cut them into about the same width to get some sort of squares.
Fill up the baking tray rather loosely. If it’s packed too tight, the dough will bake together and we won’t be able to tear it.
Cover it with a kitchen cloth then leave it in a 68°F – 81°F /20°C – 27°C place for 30 – 45 minutes to rise.
Pop the tray into the preheated 365°F / 180°C oven for half an hour. In some cases it can be done sooner, in other ovens it would take 40 minutes to be ready. So it is worth to check after 25 minutes. Get a fork or a toothpick and poke the bread if no dough is left on the toothpick, we can turn off the oven and take the bread out. Leave it cool down a bit before serving.